1. Introduction to Open5GS
Welcome! If you want to set up your first Open5GS core you have come to the right place. Before we get started, we’ll spend a moment to understand the basic architecture of the software.
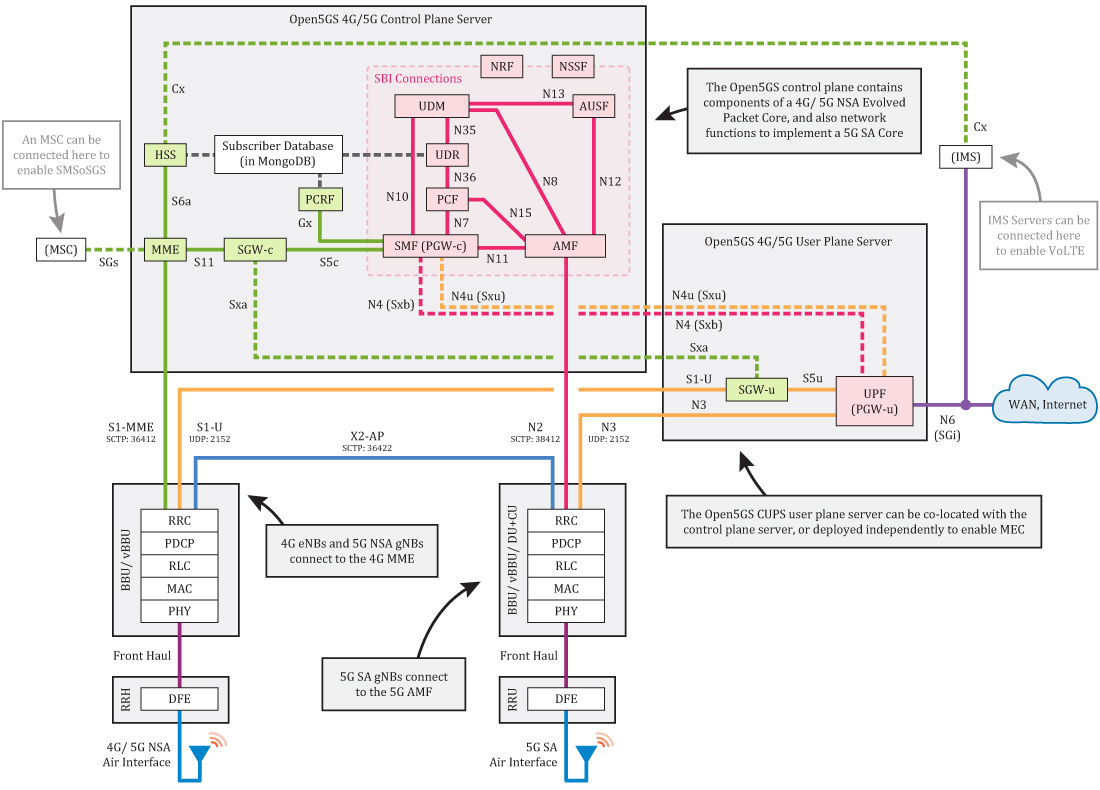
TL;DR: Open5GS contains a series of software components and network functions that implement the 4G/ 5G NSA and 5G SA core functions. If you know what each of these do already and how they interface with each other, skip to section 2.
[Higher quality PDF diagram available HERE]
4G/ 5G NSA Core
The Open5GS 4G/ 5G NSA Core contains the following components:
- MME - Mobility Management Entity
- HSS - Home Subscriber Server
- PCRF - Policy and Charging Rules Function
- SGWC - Serving Gateway Control Plane
- SGWU - Serving Gateway User Plane
- PGWC/SMF - Packet Gateway Control Plane / (component contained in Open5GS SMF)
- PGWU/UPF - Packet Gateway User Plane / (component contained in Open5GS UPF)
The core has two main planes: the control plane and the user plane. These are physically separated in Open5GS as CUPS (control/ user plane separation) is implemented.
The MME is the main control plane hub of the core. It primarily manages sessions, mobility, paging and bearers. It links to the HSS, which generates SIM authentication vectors and holds the subscriber profile; and also to the SGWC and PGWC/SMF, which are the control planes of the gateway servers. All the eNBs in the mobile network (4G basestations) connect to the MME. The final element of the control plane is the PCRF, which sits in-between the PGWC/SMF and the HSS, and handles charging and enforces subscriber policies.
The user plane carries user data packets between the eNB/ NSA gNB (5G NSA basestations) and the external WAN. The two user plane core components are the SGWU and PGWU/UPF. Each of these connect back to their control plane counterparts. eNBs/ NSA gNBs connect to the SGWU, which connects to the PGWU/UPF, and on to the WAN. By having the control and user planes physically separated like this, it means you can deploy multiple user plane servers in the field (eg somewhere with a high speed Internet connection), whilst keeping control functionality centralised. This enables support of MEC use cases, for example.
All of these Open5GS components have config files. Each config file contains the component’s IP bind addresses/ local Interface names and the IP addresses/ DNS names of the other components it needs to connect to. We’ll come back to this in Section 3.
5G SA Core
The Open5GS 5G SA Core contains the following functions:
- NRF - NF Repository Function
- SCP - Service Communication Proxy
- SEPP - Security Edge Protection Proxy
- AMF - Access and Mobility Management Function
- SMF - Session Management Function
- UPF - User Plane Function
- AUSF - Authentication Server Function
- UDM - Unified Data Management
- UDR - Unified Data Repository
- PCF - Policy and Charging Function
- NSSF - Network Slice Selection Function
- BSF - Binding Support Function
The 5G SA core works in a different way to the 4G core - it uses a Service Based Architecture (SBA). Control plane functions are configured to register with the NRF, and the NRF then helps them discover the other core functions. Running through the other functions: The AMF handles connection and mobility management; a subset of what the 4G MME is tasked with. gNBs (5G basestations) connect to the AMF. The UDM, AUSF and UDR carry out similar operations as the 4G HSS, generating SIM authentication vectors and holding the subscriber profile. Session management is all handled by the SMF (previously the responsibility of the 4G MME/ SGWC/ PGWC). The NSSF provides a way to select the network slice, and PCF is used for charging and enforcing subscriber policies, and SEPP is part of the roaming security architecture. Finally there is the SCP that enable indirect communication.
The 5G SA core user plane is much simpler, as it only contains a single function. The UPF carries user data packets between the gNB and the external WAN. It connects back to the SMF too.
With the exception of the SMF and UPF, all config files for the 5G SA core functions only contain the function’s IP bind addresses/ local Interface names and the IP address/ DNS name of the NRF.
2. Install Open5GS with a Package Manager
Note: Package managers can be used to install Open5GS in Debian/Ubuntu and openSUSE environments (for major and minor builds). CentOS, Fedora, and Mac OSX require you to build with source code.
Note: Nighly builds are offered by Osmocom on OBS. Scroll down to use a nightly build package.
Getting MongoDB
Tip: MongoDB is used as the database for PCF/UDR and PCRF/HSS.
Note: If you already have an external MongoDB server, you can skip this section and add the --no-install-recommends flag when installing the Open5GS packages (e.g. sudo apt install --no-install-recommends open5gs).
Import the public key used by the package management system.
$ sudo apt update
$ sudo apt install gnupg
$ curl -fsSL https://pgp.mongodb.com/server-8.0.asc | sudo gpg -o /usr/share/keyrings/mongodb-server-8.0.gpg --dearmor
Create the list file /etc/apt/sources.list.d/mongodb-org-8.0.list for your version of Ubuntu.
On ubuntu 22.04 (Jammy)
$ echo "deb [ arch=amd64,arm64 signed-by=/usr/share/keyrings/mongodb-server-8.0.gpg] https://repo.mongodb.org/apt/ubuntu jammy/mongodb-org/8.0 multiverse" | sudo tee /etc/apt/sources.list.d/mongodb-org-8.0.list
Install the MongoDB packages.
$ sudo apt update
$ sudo apt install -y mongodb-org
$ sudo systemctl start mongod (if '/usr/bin/mongod' is not running)
$ sudo systemctl enable mongod (ensure to automatically start it on system boot)
Ubuntu
Ubuntu makes it easy to install Open5GS as shown below.
$ sudo add-apt-repository ppa:open5gs/latest
$ sudo apt update
$ sudo apt install open5gs
Debian
The Open5GS packages for Debian are available on OBS. If you want to use the latest Debian version like Debian 10(Buster), you need to install MongoDB first.
$ sudo apt update
$ wget -qO - https://build.opensuse.org/projects/home:acetcom/signing_keys/download\?kind\=gpg | sudo apt-key add -
$ sudo sh -c "echo 'deb http://download.opensuse.org/repositories/home:/acetcom:/open5gs:/latest/Debian_10/ ./' > /etc/apt/sources.list.d/open5gs.list"
$ sudo apt update
$ sudo apt install open5gs
Other distributions can be installed by changing the path.
https://download.opensuse.org/repositories/home:/acetcom:/open5gs:/latest/Debian_10/
https://download.opensuse.org/repositories/home:/acetcom:/open5gs:/latest/Debian_11/
https://download.opensuse.org/repositories/home:/acetcom:/open5gs:/latest/Debian_Testing/
https://download.opensuse.org/repositories/home:/acetcom:/open5gs:/latest/Debian_Unstable/
https://download.opensuse.org/repositories/home:/acetcom:/open5gs:/latest/Raspbian_10/
https://download.opensuse.org/repositories/home:/acetcom:/open5gs:/latest/Raspbian_11/
https://download.opensuse.org/repositories/home:/acetcom:/open5gs:/latest/xUbuntu_18.04/
https://download.opensuse.org/repositories/home:/acetcom:/open5gs:/latest/xUbuntu_20.04/
https://download.opensuse.org/repositories/home:/acetcom:/open5gs:/latest/xUbuntu_20.10/
https://download.opensuse.org/repositories/home:/acetcom:/open5gs:/latest/xUbuntu_21.04/
https://download.opensuse.org/repositories/home:/acetcom:/open5gs:/latest/xUbuntu_21.10/
https://download.opensuse.org/repositories/home:/acetcom:/open5gs:/latest/xUbuntu_22.04/
Nightly Builds
Nightly bulit package are provided by Osmocom on OBS. On Ubuntu 20.04 you can install it like this:
$ sudo apt update
$ sudo apt install wget gnupg
$ wget -qO - https://obs.osmocom.org/projects/osmocom/public_key | sudo apt-key add -
$ sudo sh -c "echo 'deb https://downloads.osmocom.org/packages/osmocom:/nightly/xUbuntu_20.04/ ./' > /etc/apt/sources.list.d/open5gs.list"
$ sudo apt update
$ sudo apt install open5gs
Other distributions can be installed by changing the path.
https://downloads.osmocom.org/packages/osmocom:/nightly/Debian_10/
https://downloads.osmocom.org/packages/osmocom:/nightly/Debian_11/
https://downloads.osmocom.org/packages/osmocom:/nightly/Debian_Testing/
https://downloads.osmocom.org/packages/osmocom:/nightly/Debian_Unstable/
https://downloads.osmocom.org/packages/osmocom:/nightly/Raspbian_10/
https://downloads.osmocom.org/packages/osmocom:/nightly/Raspbian_11/
https://downloads.osmocom.org/packages/osmocom:/nightly/xUbuntu_18.04/
https://downloads.osmocom.org/packages/osmocom:/nightly/xUbuntu_20.04/
https://downloads.osmocom.org/packages/osmocom:/nightly/xUbuntu_20.10/
https://downloads.osmocom.org/packages/osmocom:/nightly/xUbuntu_21.04/
https://downloads.osmocom.org/packages/osmocom:/nightly/xUbuntu_21.10/
https://downloads.osmocom.org/packages/osmocom:/nightly/xUbuntu_22.04/
openSUSE
Martin Hauke packaged Open5GS for openSUSE on OBS.
$ sudo zypper addrepo -f obs://home:mnhauke:open5gs home:mnhauke:open5gs
$ sudo zypper install mongodb-server mongodb-shell
$ sudo zypper install open5gs
3. Install the WebUI of Open5GS
The WebUI allows you to interactively edit subscriber data. While it is not essential to use this, it makes things easier when you are just starting out on your Open5GS adventure. (A command line tool is available for advanced users).
Node.js is required to install the WebUI of Open5GS
-
Debian and Ubuntu based Linux distributions can install Node.js as follows:
# Download and import the Nodesource GPG key $ sudo apt update $ sudo apt install -y ca-certificates curl gnupg $ sudo mkdir -p /etc/apt/keyrings $ curl -fsSL https://deb.nodesource.com/gpgkey/nodesource-repo.gpg.key | sudo gpg --dearmor -o /etc/apt/keyrings/nodesource.gpg # Create deb repository $ NODE_MAJOR=20 $ echo "deb [signed-by=/etc/apt/keyrings/nodesource.gpg] https://deb.nodesource.com/node_$NODE_MAJOR.x nodistro main" | sudo tee /etc/apt/sources.list.d/nodesource.list # Run Update and Install $ sudo apt update $ sudo apt install nodejs -y -
To install Node.js on openSUSE, run the following:
$ sudo zypper install nodejs8
You can now install WebUI of Open5GS.
$ curl -fsSL https://open5gs.org/open5gs/assets/webui/install | sudo -E bash -
4. Configure Open5GS
Okay - you have installed the software, now what to do with it? Well, there are some tweaks you will need to make to the config files, and you will need to enter subscriber data into your HSS/ UDR. You will also need to set some IP Table rules to bridge the PGWU/UPF to the WAN.
Out of the box, the default configurations see all of the Open5GS components fully configured for use on a single computer. They are set to communicate with each other using the local loopback address space (127.0.0.X). The default addresses for each of the bind interfaces for these components and functions are as follows:
MongoDB   = 127.0.0.1 (subscriber data) - http://localhost:9999

MME-s1ap  = 127.0.0.2 :36412 for S1-MME
MME-gtpc  = 127.0.0.2 :2123 for S11
MME-frDi  = 127.0.0.2 :3868 for S6a

SGWC-gtpc = 127.0.0.3 :2123 for S11
SGWC-pfcp = 127.0.0.3 :8805 for Sxa

SMF-gtpc  = 127.0.0.4 :2123 for S5c
SMF-gtpu  = 127.0.0.4 :2152 for N4u (Sxu)
SMF-pfcp  = 127.0.0.4 :8805 for N4 (Sxb)
SMF-frDi  = 127.0.0.4 :3868 for Gx auth
SMF-sbi   = 127.0.0.4 :7777 for 5G SBI (N7,N10,N11)

AMF-ngap  = 127.0.0.5 :38412 for N2
AMF-sbi   = 127.0.0.5 :7777 for 5G SBI (N8,N12,N11)

SGWU-pfcp = 127.0.0.6 :8805 for Sxa
SGWU-gtpu = 127.0.0.6 :2152 for S1-U, S5u

UPF-pfcp  = 127.0.0.7 :8805 for N4 (Sxb)
UPF-gtpu  = 127.0.0.7 :2152 for S5u, N3, N4u (Sxu)

HSS-frDi  = 127.0.0.8 :3868 for S6a, Cx

PCRF-frDi = 127.0.0.9 :3868 for Gx

NRF-sbi   = 127.0.0.10:7777 for 5G SBI
SCP-sbi   = 127.0.0.200:7777 for 5G SBI
SEPP-sbi  = 127.0.0.250:7777 for 5G SBI
SEPP-n32  = 127.0.0.251:7777 for 5G N32
SEPP-n32f = 127.0.0.252:7777 for 5G N32-f
AUSF-sbi  = 127.0.0.11:7777 for 5G SBI
UDM-sbi   = 127.0.0.12:7777 for 5G SBI
PCF-sbi   = 127.0.0.13:7777 for 5G SBI
NSSF-sbi  = 127.0.0.14:7777 for 5G SBI
BSF-sbi   = 127.0.0.15:7777 for 5G SBI
UDR-sbi   = 127.0.0.20:7777 for 5G SBI
Setup a 4G/ 5G NSA Core
You will need to modify your 4G MME config to support your PLMN and TAC. The international test PLMN is 001/01, and the international private network PLMN is 999/99. You should stick to using either of these PLMNs unless you have been issued a PLMN by your national regulator. (This PLMN will need to be configured in your eNB).
If you are aiming to connect an external eNB to your core, you will also need to change the S1AP bind address of the MME and the GTP-U bind address of the SGWU. If you are running an eNB stack locally, you will not need to make these changes.
Modify /etc/open5gs/mme.yaml to set the S1AP IP address, PLMN ID, and TAC.
$ diff --git a/configs/open5gs/mme.yaml.in b/configs/open5gs/mme.yaml.in
index db2cdaef1..2010f6691 100644
--- a/configs/open5gs/mme.yaml.in
+++ b/configs/open5gs/mme.yaml.in
@@ -10,7 +10,7 @@ mme:
     freeDiameter: @sysconfdir@/freeDiameter/mme.conf
     s1ap:
       server:
-        - address: 127.0.0.2
+        - address: 10.10.0.2
     gtpc:
       server:
         - address: 127.0.0.2
@@ -25,14 +25,14 @@ mme:
           port: 9090
     gummei:
       plmn_id:
-        mcc: 999
-        mnc: 70
+        mcc: 001
+        mnc: 01
       mme_gid: 2
       mme_code: 1
     tai:
       plmn_id:
-        mcc: 999
-        mnc: 70
+        mcc: 001
+        mnc: 01
       tac: 1
     security:
         integrity_order : [ EIA2, EIA1, EIA0 ]
Modify /etc/open5gs/sgwu.yaml to set the GTP-U IP address.
$ diff --git a/configs/open5gs/sgwu.yaml.in b/configs/open5gs/sgwu.yaml.in
index 7266e47fb..d640f0357 100644
--- a/configs/open5gs/sgwu.yaml.in
+++ b/configs/open5gs/sgwu.yaml.in
@@ -15,7 +15,7 @@ sgwu:
 #          - address: 127.0.0.3
     gtpu:
       server:
-        - address: 127.0.0.6
+        - address: 10.11.0.6

 ################################################################################
 # PFCP Server
After changing config files, please restart Open5GS daemons.
$ sudo systemctl restart open5gs-mmed
$ sudo systemctl restart open5gs-sgwud
Setup a 5G Core
You will need to modify the PLMN in your NRF and AMF config, and in case of AMF, further modify the TAC information. The international test PLMN is 001/01, and the international private network PLMN is 999/99. You should stick to using either of these PLMNs unless you have been issued a PLMN by your national regulator. (This PLMN will need to be configured in your gNB).
If you are aiming to connect an external gNB to your core, you will also need to change the NGAP bind address of the AMF and the GTPU bind address of the UPF. If you are running an gNB stack locally, you will not need to make these changes.
Modify /etc/open5gs/nrf.yaml to set the Serving PLMN ID.
$ diff --git a/configs/open5gs/nrf.yaml.in b/configs/open5gs/nrf.yaml.in
index cd9e45feb..58e8cbbce 100644
--- a/configs/open5gs/nrf.yaml.in
+++ b/configs/open5gs/nrf.yaml.in
@@ -10,8 +10,8 @@ global:
 nrf:
   serving:  # 5G roaming requires PLMN in NRF
     - plmn_id:
-        mcc: 999
-        mnc: 70
+        mcc: 001
+        mnc: 01
   sbi:
     server:
       - address: 127.0.0.10
Modify /etc/open5gs/amf.yaml to set the NGAP IP address, PLMN ID, TAC and NSSAI.
$ diff --git a/configs/open5gs/amf.yaml.in b/configs/open5gs/amf.yaml.in
index 938917e32..35d0ab5aa 100644
--- a/configs/open5gs/amf.yaml.in
+++ b/configs/open5gs/amf.yaml.in
@@ -18,27 +18,27 @@ amf:
           - uri: http://127.0.0.200:7777
     ngap:
       server:
-        - address: 127.0.0.5
+        - address: 10.10.0.5
     metrics:
       server:
         - address: 127.0.0.5
           port: 9090
     guami:
       - plmn_id:
-          mcc: 999
-          mnc: 70
+          mcc: 001
+          mnc: 01
         amf_id:
           region: 2
           set: 1
     tai:
       - plmn_id:
-          mcc: 999
-          mnc: 70
+          mcc: 001
+          mnc: 01
         tac: 1
     plmn_support:
       - plmn_id:
-          mcc: 999
-          mnc: 70
+          mcc: 001
+          mnc: 01
         s_nssai:
           - sst: 1
     security:
Modify /etc/open5gs/upf.yaml to set the GTP-U address.
$ diff --git a/configs/open5gs/upf.yaml.in b/configs/open5gs/upf.yaml.in
index e78b018f1..35a54419e 100644
--- a/configs/open5gs/upf.yaml.in
+++ b/configs/open5gs/upf.yaml.in
@@ -15,7 +15,7 @@ upf:
 #          - address: 127.0.0.4
     gtpu:
       server:
-        - address: 127.0.0.7
+        - address: 10.11.0.7
     session:
       - subnet: 10.45.0.1/16
       - subnet: 2001:db8:cafe::1/48
After changing config files, please restart Open5GS daemons.
$ sudo systemctl restart open5gs-nrfd
$ sudo systemctl restart open5gs-amfd
$ sudo systemctl restart open5gs-upfd
Configure logging
The Open5GS components log to /var/log/open5gs/*.log and to stderr by default.
Avoid duplicate timestamps in journalctl
Open5GS adds timestamps to each log line in the log file, and on stderr. If you run Open5GS with systemd and prefer looking at the logs with journalctl, then each line will have two timestamps. To fix this, disable the timestamp for stderr with the following configuration change:
diff --git a/configs/open5gs/mme.yaml.in b/configs/open5gs/mme.yaml.in
index 87c251b9d..599032b8a 100644
--- a/configs/open5gs/mme.yaml.in
+++ b/configs/open5gs/mme.yaml.in
@@ -1,6 +1,9 @@
 logger:
+  default:
+    timestamp: false
   file:
     path: /var/log/open5gs/mme.log
+    timestamp: true
 #  level: info   # fatal|error|warn|info(default)|debug|trace

 global:
Register Subscriber Information
Connect to http://localhost:9999 and login with admin account.
Username : admin
Password : 1423
Tip: You can change the password in Account Menu.
To add subscriber information, you can do WebUI operations in the following order:
- Go to
SubscriberMenu. - Click
+Button to add a new subscriber. - Fill the IMSI, security context(K, OPc, AMF), and APN of the subscriber.
- Click
SAVEButton
Enter the subscriber details of your SIM cards using this tool, to save the subscriber profile in the HSS and UDR MongoDB database backend. If you are using test SIMs, the details are normally printed on the card.
Note: Subscribers added with this tool immediately register in the Open5GS HSS/UDR without the need to restart any daemon. However, if you use the WebUI to change subscriber profile, you must restart the Open5GS AMF/MME daemon for the changes to take effect.
Adding a route for the UE to have WAN connectivity
In order to bridge between the PGWU/UPF and WAN (Internet), you must enable IP forwarding and add a NAT rule to your IP Tables.
To enable forwarding and add the NAT rule, enter
### Enable IPv4/IPv6 Forwarding
$ sudo sysctl -w net.ipv4.ip_forward=1
$ sudo sysctl -w net.ipv6.conf.all.forwarding=1

### Add NAT Rule
$ sudo iptables -t nat -A POSTROUTING -s 10.45.0.0/16 ! -o ogstun -j MASQUERADE
$ sudo ip6tables -t nat -A POSTROUTING -s 2001:db8:cafe::/48 ! -o ogstun -j MASQUERADE
Configure the firewall correctly. Some operating systems (Ubuntu) by default enable firewall rules to block traffic.
$ sudo ufw status
Status: active
$ sudo ufw disable
Firewall stopped and disabled on system startup
$ sudo ufw status
Status: inactive
Optionally, you may consider the settings below for security purposes.
### Ensure that the packets in the `INPUT` chain to the `ogstun` interface are accepted
$ sudo iptables -I INPUT -i ogstun -j ACCEPT

### Prevent UE's from connecting to the host on which UPF is running
$ sudo iptables -I INPUT -s 10.45.0.0/16 -j DROP
$ sudo ip6tables -I INPUT -s 2001:db8:cafe::/48 -j DROP

### If your core network runs over multiple hosts, you probably want to block
### UE originating traffic from accessing other network functions.
### Replace x.x.x.x/y with the VNFs IP/subnet
$ sudo iptables -I FORWARD -s 10.45.0.0/16 -d x.x.x.x/y -j DROP
5. Turn on your eNB/gNB and UE
First, connect your eNB/gNB to the Open5GS core:
- Make sure the PLMN and TAC of the eNB/gNB matches the settings in your MME/AMF
- Connect your eNB/gNB to the IP of your server via the standard S1AP/NGAP SCTP port 36412/38412 (for MME/AMF)
- Your eNB/gNB should report a successful S1/NG connection - congrats, your core is fully working!
- You can see actual traffic through wireshark – [srsenb.pcapng].
- You can view the log at
/var/log/open5gs/*.log, eg:### Watch the live MME log tail -f /var/log/open5gs/mme.log
Next, try to attach a UE to the basestation:
- Insert your SIM card to the UE
- Set the UE’s APN to match the APN you configured in the Open5GS WebUI
- Toggle the UE in and out of flight mode
- If it doesn’t automatically connect, try manually searching for a network
- If the PLMN set on the SIM card does not match the PLMN being used by the radio, you will need to ensure ‘data roaming’ on the UE is switched on
6. Starting and Stopping Open5GS
When you install the software using the package manager, it is setup to run as a systemd service. You can stop and restart the components and network functions as follows:
$ sudo systemctl stop open5gs-mmed
$ sudo systemctl stop open5gs-sgwcd
$ sudo systemctl stop open5gs-smfd
$ sudo systemctl stop open5gs-amfd
$ sudo systemctl stop open5gs-sgwud
$ sudo systemctl stop open5gs-upfd
$ sudo systemctl stop open5gs-hssd
$ sudo systemctl stop open5gs-pcrfd
$ sudo systemctl stop open5gs-nrfd
$ sudo systemctl stop open5gs-scpd
$ sudo systemctl stop open5gs-seppd
$ sudo systemctl stop open5gs-ausfd
$ sudo systemctl stop open5gs-udmd
$ sudo systemctl stop open5gs-pcfd
$ sudo systemctl stop open5gs-nssfd
$ sudo systemctl stop open5gs-bsfd
$ sudo systemctl stop open5gs-udrd
$ sudo systemctl stop open5gs-webui
$ sudo systemctl restart open5gs-mmed
$ sudo systemctl restart open5gs-sgwcd
$ sudo systemctl restart open5gs-smfd
$ sudo systemctl restart open5gs-amfd
$ sudo systemctl restart open5gs-sgwud
$ sudo systemctl restart open5gs-upfd
$ sudo systemctl restart open5gs-hssd
$ sudo systemctl restart open5gs-pcrfd
$ sudo systemctl restart open5gs-nrfd
$ sudo systemctl restart open5gs-scpd
$ sudo systemctl restart open5gs-seppd
$ sudo systemctl restart open5gs-ausfd
$ sudo systemctl restart open5gs-udmd
$ sudo systemctl restart open5gs-pcfd
$ sudo systemctl restart open5gs-nssfd
$ sudo systemctl restart open5gs-bsfd
$ sudo systemctl restart open5gs-udrd
$ sudo systemctl restart open5gs-webui
7. Uninstall Open5GS and WebUI
To remove the Open5GS packages:
-
On Ubuntu/Debian:
$ sudo apt purge open5gs $ sudo apt autoremove -
On openSUSE:
$ sudo zypper rm open5gs
You may need to remove manually /var/log/open5gs unless it is empty.
$ sudo rm -Rf /var/log/open5gs
The WebUI of Open5GS can be removed as follows:
curl -fsSL https://open5gs.org/open5gs/assets/webui/uninstall | sudo -E bash -